I decided I needed to do some work on the TR6. Project one went pretty much as planned, rear differential shims. Project two, not so much….
Images and notes below:
PROJECT 1: Rear Differential Shims….
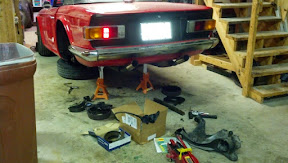 It started with the typical Triumph “clunk”. If you know anyone with a TR, then this is easier to understand. Rumor has it that Hamer Phillips once said when asked about such a TR clunk – “They do that.” Hamer is a genius. In the TR6 it is usually one of 2 things. 1) One of the differential mounts is cracked, or 2) Worn shims inside the differential that allow too much slop – causing the “clunk” on take-off and between shifts. I rebuilt the TR6’s rear suspension last year, so I was pretty sure it was not the mounts, they had been box welded by the previous owner – which is the recommended fix for those. So I got the differential out and pulled it apart. I was glad to see that the gears all looked to be in very good shape. I ordered new thrust washers for the Sun gears and a variety of shims for the Planet gears. By the way, in my opinion, a differential is a marvel of engineering. Really, it is. It ensures power to whichever wheel is turning slower, or more or less equally to both if turning at the same speed. Somebody had to devise it, build it/test it. Wow. I could find no definitive
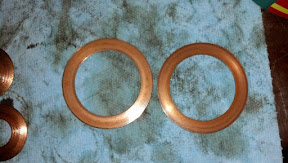 inventor, some claim the differential was used in chariots as early as the 1000 to 750 B.C. time frame. Double wow…. Anyway, back to my project. In my internet research, I discovered that the early TR6 and TR250 and TR4 rear ends used metal thrust washers. Beginning in about 70 or 71, they went to fiber washers. So based on that, I feel pretty sure that my 1976 TR6 had an “other than original” rear end, see the metal thrust washers that I removed. I could only find fiber washers to replace them, so that is what I had to use. I ordered different combinations of the planet gear shims, they were cheap, and the conventional wisdom is to play with the shims til you get as much slop out as you can. As luck would have it, I was between – between. By that I mean – the .068 shims were absolutely too big. The
 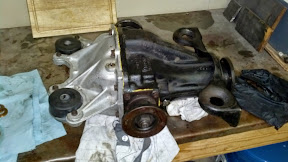 .062 shims were a tiny bit too small, still leaving a slight bit of slop/clunk. So…. Maybe I could use one .062 and one .068? And I am sure I could have, but it was just a bit too tight and I was not comfortable trying to do that. So I went with the .062 shims, and remembered Hamer’s comment – they do that. And mine is a lot better but still does.
I actually got this differential project done within a couple of weeks after wrapping up the 2013 Tired Butt’s Tour. Idle hands….. My TR6 has used oil for years. But I felt I had finally diagnosed it down to the valve guides. Not deeply scientific, but some common sense empirical studies, and I was pretty sure they were the culprit. So, I planned to replace the valve guides. And that’s how it all started…..
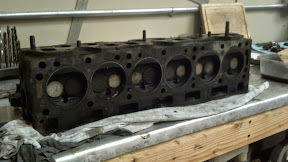
This point in time is early December. I pulled the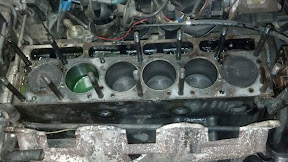 head and I was actually pretty happy at that point – at what I discovered. I don’t know how many miles my TR6 has on it – nobody does. The previous owner said he put maybe 6 or 8 thousand miles on it with the speedometer/odometer not working. And his Uncle had it before then, and put who knows how many miles on it – with it broken. The odometer showed like 84,000 when I got it in 2007. I replaced the speedometer with a good used one from a fellow 6-Pack club member for $25. And it showed 86,000 so I just plopped it in. As of the end of Tired Butts it was reading almost 98,000. So I think it’s safe to say it has well over 100 thousand on it. Some carbon scraping from the pistons revealed the original pistons. It had never been bored out – and it had no cylinder ridge to speak of – explaining my overall happiness. I may not have to spend a ton of money to freshen this motor up! Enter Blitz Welch….Before I try to blame anything on Blitz, I must first acknowledge his help and kindness. Blitz loaned me his engine hoist, a valve compressor – and as important as anything – his advice. THANK YOU Blitz!
 So as I was saying, enter Blitz….. “Well since it all looks to be stock stuff — that means your engine has never been rebuilt, and probably never cleaned. There is 38 years of gook in there. While you are in there (these words will eat your wallet and spit it out, trust me) you may as well have the block tanked/boiled to clean out the oil passages, etc.”. Andy responds with – “That’s a great idea!”. So out comes the engine and Transmission. And another shout
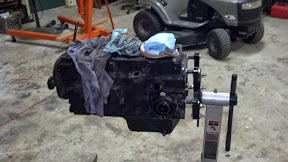
  out/thanks to David Price, and my pal Tony Loria for helping me pull the motor and tranny. I would not have wanted to do that by myself. And those two guys also helped sever the tranny from the motor. Tony and I got the motor on an engine stand. A 6 cylinder engine will stress an engine stand if you mount it long ways, as I did. I wound up putting supports under the far end, I was afraid it would snap loose from the 4 small-ish 5/16th bolts I had holding the engine on the stand. Later in this story, you will see in some pictures that I changed it around and mounted the motor on the stand “sideways”.
 So I went to pulling everything apart. I had already removed the radiator, hoses, carbs and exhaust manifold and all the connections before we pulled the motor. And the head was off, so it was really just a bottom end motor disassembly. Everything pulled apart and labeled. And I Mic’ed the crankshaft journal and the cylinder bores and they seemed close to spec, so again, I was happy and thinking I was going to escape this project under $1,000 bucks! But… I also Mic’ed my Cam shaft and I was pretty sure it was toasted. I could maybe think about a hotter Cam, “while I was in there”, and that might mean more power! Off to the machine shop to let them tank the block and tell me how awesome my motor tolerances/measurements were…. NOT! I used Durbin’s Auto Parts and Machine shop in Prattville, Alabama. They had resurfaced my Flywheel in 2008 or so when I installed a new clutch, and I called Shawn at Auto-metrics and he confirmed that Durbin’s was the best machine shop for our British cars.
The short version basically goes like this – I may could have escaped with the old pistons and a new set of pistons rings, and may be also with new bearings for the Mains and Connecting Rods, but according to Durbin’s I was just barely within spec, and they recommended boring the cylinders and grinding the crankshaft journals to be safe. Budget blown at this point! So I go and talk to Henry at Durbin’s about what all we can do.
My confidence in Durbin’s was somewhat 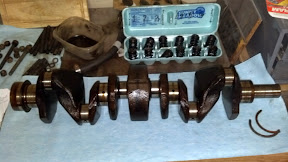 bolstered after my visit though, even if I was sweating the dollar increases. Henry had a circa 1940 Graham Hollywood motor at his shop when I visited, it was very cool. A super charged straight 8. It used Cotter pins and wire ties for all of the mains and connecting rod bolts – I had never seen that before. Well, if his shop is good enough for a Graham Hollywood, it’s good enough for me!
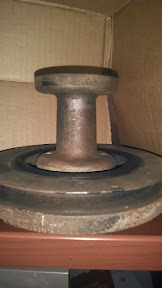 And Henry also confirmed that the damper (harmonic balancer) should really be rebuilt. I figured it would with the visible cracks in the rubber. I could not afford one of those $800 racing dampers, so I shipped mine to Damper Dudes in California and had it rebuilt for $107 plus shipping. And in some of my internet research I saw some info on “re-curving” a distributor. I had not even thought about that. But it made sense, using different springs and weights in the dizzy since I am trying to increase the TR6’s horsepower by 50{d7bb5f80100d9cc8ed36d8b44483fdbf859ff4aee0deeb25afed5de8e54bd8dc} or more. So that was shipped off to Advanced Distributors in Minnesota. Just barely less than $200 total with shipping.
I also tried to get a few things taken care of while stuff was at the machine shop and I was waiting on parts. Touch up paint for the engine bay, and installing new accelerator cams. The accelerator cams were interesting, what I guessed should be a 20 minute job was about 6 hours. I have no idea how they installed them at the factory. After 5 hours of failing, I finally used the last hour to modify them so I could get them in. They are chewed up, but they are better than that accelerator shaft sitting on metal – which it was. So everything got back from the machine shop like February 7th. I got the engine back on the engine stand and tried to get my bearings (pun intended).
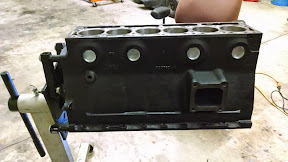
 I wanted to paint the engine red to more or less match the color of my car – Porsche Gaurd Red from 1980 I think. So I started some prep for that, painting the block first with a base coat of POR-15 black (POR stands for “Paint Over Rust”). I knew an exact match was futile, because the engine block would be subjected to more heat than the other painted areas, so I just wanted to get close. I chose “Chevy Red” from one of POR-15’s Engine Enamel colors. We will see…..
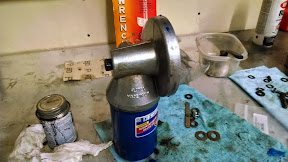
Then I got to work on installing the crank and pistons/connecting rods. 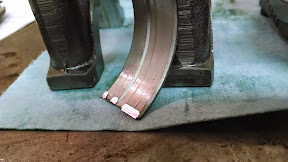 That took all of the weekend February 22 and 23. And yes, included a mishap with a bearing shell that slipped out/around and I tried to bolt in a main bearing cap and smushed the edge (SEE PICTURE). Fortunately for me, Richard Good at Good Parts had a set he could break up and sell me a single extra bearing. $15 versus $60 for a whole new set. Small victories at this point…..
And I had to get a little creative with all of the added expenses. The crank grinding, block boring, new pistons, distributor re-curving, damper rebuilding and shaving of the head were all expenses I had not planned for ($240 extra for shaving the head — because of the amount of material to be removed in order to get my Compression Ratio from stock 7.6:1 up to about 9.5:1). But that has most to do with getting the HP boosted, so I found many ways to justify it. Some of my creativity was in areas like my valve rockers. They too had more than 100,000 miles of wear and were obviously in need of some love. New rockers would add about $150 plus shipping, so how can I reuse? A little internet research and I decided to reface the rockers myself. I created a jig to help me do it, see the video here – http://youtu.be/o-IBCNadO8Q . And I am pleased with the results. Maybe some $800 roller rockers in a few years, after I pay off this engine rebuild! Yes, it’s all on credit cards….
And I successfully used a “Ferris Beuller” technique to get my car mileage adjusted. Earlier I noted that the mileage was almost 98,000. Yes….. I put a variable speed drill on my speedo cable at about 100 MPH, and a little over 20 hours later, my odometer reads zero – see video here (http://youtu.be/NKXR5fu7syA). Thank you, thank you very much….
Another upgrade that was good but not planned for was the Cam. I planned to use a reground Cam from GoodParts and send him my old one as a core, my net investment $200. But since my old cam measurements indicated that it was no good as a core, that meant $300 for a reground Cam. At that point, why not get a new chilled iron Cam at $350 and requires no core, “and the chilled iron is so much harder and better….”. Yeah, I took the bait.
The distributor came back and looked great. It had an electronic ignition in it when I sent it off, but came back with points and condenser. I was not upset, my electronic ignition module was in a little bag inside the box as well — I was mostly just curious why. So I sent Jeff at Advanced Distributors an email asking my question, I thought in a nice and curious way. I guess my e-mail came across other than I intended. Jeff’s response was curt, and basically indicated that I had hired him to do a Job and that is exactly what he had done. After this interaction, I heard from another source that Jeff did fabulous work, and that having him re-curve their distributor was “the best money they had spent”. It’s hard to say, but maybe if I had known that in advance, I would not have sent Jeff my question in the first place. Well, be that as it may, in my opinion the opposite of that spectrum is Richard Good of Goodparts. What a gentleman. I asked a thousand questions and he patiently answered all. He is to whom I was referring, that broke up a set of main bearings for me earlier. A VERY good man, and I highly recommend him to anyone that is doing work on a TR6 or Spitfire, as that is what his business is devoted to.
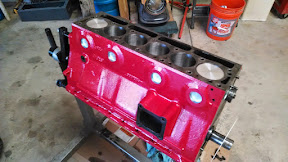
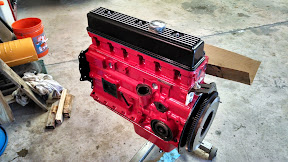
 So, late February and Early March, all of the “shipped off parts” started coming back, and I realized I had a lot to do before I could begin wrapping things up. All I had really gotten done since the crank and pistons install, was to put the Cam in (SEE PICTURE of my device for putting lube in the Cam journals – VERY sophisticated!). I still had plenty of parts to paint — and old bolts to clean up and repaint, but the POR-15 engine enamel (in Chevy Red) was back ordered, so that made a convenient excuse. It finally showed up about March 6, so the weekend of March 8 and 9 was spent doing some of that. The POR-15 Engine enamel took some time to figure out. Its thick like molasses and I messed up the fan adaptor and the oil pan first. It’s very easy to put way too much of it on — and I figured the pan (sump for you Brits) was on the bottom, nobody would see it. With the timing cover I got a little too aggressive the other way (didn’t use enough) and it was about a polar opposite of the sump.
 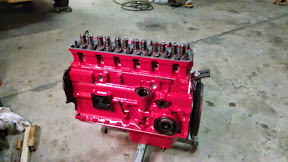 So its second coat made it look mottled. But by the time I got to the engine block, I about had it figured out. And the engine block actually turned out pretty good. I realized now that I had forgotten all about the head. So as the day was winding down for me, I put a coat of POR-15 black rust killer on the head and called it a weekend.
 During the week, I realized that I still had a lot of parts to clean up. I could have been doing that while waiting on the Red Engine enamel — oh well. I went through all of the parts and began to think I wanted more red. The water pump, the water rail, the distributor clamp, the alternator bracket. So I cleaned and degreased them during the week. The weekend of March 15 and 16 was spent putting a coat of POR-15 black on all of those parts before the rain came, I just made it. I also got the sump installed, and the rear main oil seal and housing, the rear engine plate, and the fly wheel. Oh yeah, as i mentioned earlier, in order to get the rear main seal and rear plate/flywheel on, I had to mount the engine on the stand sideways rather than long ways, so the engine hoist and some different bolts were needed. A trip to Store Room Fasteners got me what was needed for that. Store Room Fasteners has almost everything, and when I have some extra money, I would love to stock my bolt bin with some of the “fine thread” stuff the Brits used almost exclusively on our cars. I have a feeling that will have to wait a while.
Like I said, the rain came in Saturday night, so I decided not to put any red on during the rain and instead work on getting the crank and cam timing gears on.
So…. My plan to do the timing gears and such was foiled when I realized I would not be able to get to the cam locating plate once all the gears were in place (I had to order it once I realized I had forgotten to include it in a prior order :-). I could tell a long story about a guy killing my mailbox with his SUV at my office so that mail had to be delivered by hand, and my not being there Saturday meant having to wait for my new cam locating plate until Monday, but there is the short version. So I was able to get the front engine plate on and I built a Piston Stop from one of my old trailing arm mounts so at least some progress was made while waiting. With the piston stop and my flywheel installed, I found top dead center on the flywheel (and it was dumb luck that the TDC mark on the flywheel was where it was supposed to be). And since the rain seemed to push through by noon or so, I put coat one of the red on the water pump and such mentioned above.
The week of March 17th. I was able to get to the shop a couple of nights this week. The accomplishments were small, but victories nonetheless. The new cam locating plate showed up. And I had an issue that when finger tight the cam spun great, but when the locating plate was tightened down, the cam was bound up. Some internet research revealed others that had this problem, turns out that under stress, the cam plate “arches”, and the middle of the arch is too tight against the cam, hence the binding. And sure enough, I used the advice of a guy named Ed Hollingsworth and used the old plate tightened down (though I did flip mine over, it is symmetrical), and the clearance at the “arch” was dead on specs. ) . So, now to the timing…
I was really intimidated by the timing, I just could not get my head around it. But the same guy mentioned above, Ed Hollingsworth was doing nearly all the same things I am (GoodParts GP2 cam, shaved head for higher compression, etc.) , and his explanation was simple, and eventually led me to a better understanding. His explanation went like this — get the crank to Top Dead Center, then use a dial gauge to find the point at which the intake valve on #1 piston is moving down, and the exhaust is moving up, and they are at equal heights — or equal lift points using your dial gauge (he referred to this point as “crossover”). Think of a 12 story building with 2 elevators. One starts on floor 1 and the other on Floor 12 and they take off at the same time. They would meet in the middle around floor 6 — and that would be the crossover point. I modified the technique a bit — but it worked for me. Ed had built some cylindrical inserts to fit in his valve tappets to get them high enough out of the block to take a measurement. What I did was insert one tappet, then another one, but upside down and on top of the first one. And I did this for both the intake and exhaust valves on #1. Then I used my phone app for leveling, and bridged the phone across both double-tappets until I was dead on level. And since the new crank and cam sprockets did not have punch marks on them, I did a direct comparison — and used a sharpie pen to make marks where the old ones indicated the punch marks should be. Once your cam is at the crossover point, and your crank is at TDC, just a matter of getting the sprockets on and holes matched up without losing your cam and crank locations. So, I was then able to understand HOW the cam timing info provided with the cam was meant to be consumed/interpreted. Its really a lot more info that is needed, and honestly, that was what confused me. All you need is the desired degree wheel reading when the Intake valve is at .050 lift. So you use a dial indicator to measure when the intake valve tappet/lifter has risen .050 from its bottom point, and at that measurement, your degrees indicated on the crankshaft degree wheel should be what is provided with your cam timing info. In my case it was 3.5 degree Above Top Dead Center. And if you want your initial timing to be “advanced”, by X degrees, then then you add that to the cam degrees at .050 lift. Again, in my case, looking for about 8 degrees of advance that would mean about 11.5 degrees at intake lift of .050. Jeff Schlummer at Advanced Distributors recommended more like 9 to 12 degrees of advance, so I am not going to sweat it — and shoot for something close to 10 degrees of advance. Whew!
I should probably mention too that I had a devil of a time with the sprocket alignment. My issue seemed to be unique, as most folks seemed to have the opposite problem. Most people have to add shims behind their crank gear to push it out from the block, in order to align it with the cam gear. And they have to play with shims on the crank gear/sprocket to get alignment. My problem was that I could not get the crank gear back on the shaft far enough to get in alignment. Close, but not there. I pulled a muscle in my brain on this one, and finally realized — the problem was a gasket. It really was dumb luck I discovered it. I was tired of thinking about it and cleaning up a little, and I went through the remaining gaskets from the gasket kit I purchased for the rebuild. As I went through them, there was a gasket that looked a lot like the front engine plate gasket I had already installed. But this one was thicker. Had I installed the wrong gasket? Should I have installed both? I toyed with the idea of pulling the front plate off — but when I tried — it would not budge. And when sitting there trying to decide how and if I was taking the front cover off — ding! it dawned on me that the thicker gasket (or both) would have moved the plate more forward, meaning the cam locating plate was more forward, meaning the cam itself was more forward, and the cam gear/sprocket would be more forward — solving my alignment issue.
By this time, I was pretty sure I was NOT taking the front plate off. So I dug through my stash, I actually call it my “Etc. Bucket”, and found 2 ultra-thin washers that I could put behind the cam locating plate, and get the nose of the cam out just a bit. And sure enough, they put the sprockets in perfect alignment. I was still a little apprehensive, so I looked down the tappet/lifter holes and the cam lobes were all “in the right window” so to speak. Some were a gnat’s hair to the left of center and others a gnat’s hair to the right, but certainly no worse than before I moved everything forward .05 inches or so. I feel pretty good about my solution, but it’s not technically “correct” so if I am back in there soon, this may be why, and there is only one person to blame……
Next, I installed the sprockets and chain, and then double checked my timing using the degree wheel and dial indicator at 050 Intake lift. I was at about 11 degrees BTDC, and I think I can easily adjust that (at the distributor) to the 11.5 to 15 degrees BTDC that includes both Richard Good’s and Jeff Schlummer’s recommended ranges. Then, in went the valve tappets/lifters with good blobs of Z-Paste assembly lube. Next the head studs, head gasket and the head is on! It felt like a milestone, the date, March 19.
I took the day off from work Friday the 21st — with the goal of the motor running by the end of the weekend. Picking up where I left off, the head was on, but not tightened down. So I torqued that down, then installed the valve train. Earlier I boasted about my ingenious refacing job on my valve rockers, but I had less confidence with the train installed. I set the gap on all twelve valves, twice around. And the proper gaps seemed to be elusive. It was close, but I expect to be back in adjusting them in a few hundred miles anyway, since that is the standard as the new components (cam, tappets/lifters) wear in. (NOTE: I had to adjust them much sooner than a few hundred miles. Blitz Welch had — and recommended a “Go, No Go” feeler gauge and with that and David Price’s help the valves rocker clearances got readjusted and made a HUGE difference in the engine performance. But this jumps ahead — all of this is unknown to me at this point in the story!)
I found more parts that either still needed cleaning or painting. Distributor pedestal, alternator bracket, and lots of nuts and bolts that needed cleaning up. So I wound up the day working on that stuff, and getting ready for install..
Saturday the 22nd, I started by cleaning up. Tools and rags were everywhere, boxes that new parts had come in were still laying about, just a little messy. And I was planning to get the motor in the car during the day, and help was showing up about noon, and I wanted us to be able to walk around and find all the tools we needed. That took a while. Then I started laying out the nuts and bolts we would need for the set of tasks to get the motor ready to go — and trying to think things through. My pal Tony showed up about noon, his idea was to put as much on the motor as we could while it was out. It would be easier, and that seemed to make sense. In some cases yes, in other cases no. I lost an hour looking for my clutch locating tool, so we could install the pressure plate/clutch assembly and the transmission. Finally found that — and got that stuff installed OK. We were ready to install the motor and tranny — and off we went. As I said, some things on the motor was good, some things off would have been better, and here are my thoughts/lessons on that, at least for a TR6:
- Motor Mounts – Do not install them in the engine bay. My advice is to leave them off altogether. Some of that is driven by the fact that I had not removed the steering rod. Its a leaner deal without them on the block, and less to dodge as you insert the motor.
- Water Pump and Water Rail – Be sure they are together and aligned before installation. The water rail (returning hot water from the manifold heater rail, and the heater core) will not install if the water pump is already in place on the block (ask me how I know). The rail fitting that goes into the water pump should be a compression fitting, but nearly 40 years of inattention seals it up, and better left alone in my opinion.
- Leave the fan and adapter/extension off the motor, until after it is installed, but put it on before the Radiator (again, ask me how I know…)
- I did not install the intake and exhaust manifolds before installing the motor — but I think it would have been fine to do so — and certainly much easier than installing them once in the engine bay.
- Do not install the alternator until after the motor is installed. Hard to get to the motor mount bolts with it in the way.
That’s pretty much it — based on my experience and advice.
So Saturday wound down with the motor mounts and tranny mounts in place and a few other items installed including the adapter and fan, fuel pump, and oil pressure sensor.
Sunday the 23rd I arrived to the smell of gasoline, and had to sure up the fuel pump install (it’s a mechanical fuel pump rather than electric like the vast majority of our British sports cars). Then something shiny caught my eye, and I was missing a good many washers. They had fallen between the starter and the block. Those took 45 minutes to fish out. It’s always those things that you never plan on…..
I had just hooked the starter back up to its wiring when Blitz Welch popped by, to check things out and chat a bit. He was on his way to work on his Spitfire, and it was a nice break. Of course the conversation wandered in and around British car stuff, and as I said, it was a welcome respite.
Well, back to work….. The exhaust manifold to the down pipes was first, hard to get to, taking longer than anyone would imagine. The alternator was a real mystery. I felt sure I had not lost or misplaced any parts, and if so, there was no way it was going to install according to the Bentley Manual (though what it supplied was so vague, who knows!). The geometry just wouldn’t work itself out. So we rigged it with a bunch of washers and the “swing” arm that is tightened to adjust the belt tension was below the alternator rather than above it. The next time I have an opportunity to peer into another TR6 engine bay, you can bet that will be tops on my list to inspect.
Then the manifolds needed to install to the head. The mess of bolts nuts and washers that had come out of there was voluminous, and yes, I had not properly sorted those out. Long story a little shorter, the Previous Owner had installed some non-stock stuff. So I was faced with figuring out what had been done, or ordering and waiting on the missing parts. I opted to sort things out — since it had obviously worked at some point, and that took a good deal of time. I had a short list of fine thread bolts I needed from Store Room fasteners, so a lunch run by there on Monday was the plan. By 5PM I am running out of steam, and still had the radiator and all the hoses, distributor and battery to install. My goal of starting the car this weekend was lost. The truth was , it was lost much earlier that day.
Monday, March 24. So now I am thinking that if I have the car running before the end of March that will be good. I have an 8 day week to get it done in — I SHOULD be able to do that. Again, we will see…..
After work I went by the shop with my new fine thread bolts. I bought them too long. So I put about 5 cut-off wheels (one after the other…) on my Dremel and took a little over ½ inch off of each, and they worked fine, but for one. Not going into that boring detail at this point.
I went to work installing the fan, radiator, cooling/heater hoses, fuel lines to carbs (they were still on the intake manifold — I had tuned them up I thought pretty well about a year ago) and throttle linkage. From my earlier accelerator rod cam replacement, I was way off on the throttle actuator location on the shaft, so I had to get that adjusted — and did. On the hoses, I was mysteriously missing 3 hose clamps. No idea where those are, so I will just replace them.
Not sure that I mentioned earlier, but my charcoal canister that assumedly takes gas tank vapors as well as somehow handles the anti-run on stuff (dieseling) was toast. Well, the canister was OK, but the hoses were all cracked and busted up. So it is not planned to go back in — don’t tell the Gov-ment on me.
So…. The “to do” list for Tuesday March 25th is:
- Run out at lunch and get the hose clamps needed
- After work, install those clamps
- Remove thermostat cover and fill head/block with antifreeze, replace, fill radiator
- Hook up the choke cable
- Install oil filter adaptor and filter & fill her up with break in oil (Brad Penn’s Green Oil)
- Install the battery (I remembered to re-charge it, amazing!)
- Use a drill in reverse to prime the oil pump, check for oil pressure
- Check Distributor gear end-float (to determine gasket thickness needed), install Distributor
- Plug wires
10. Whatever else I forgot (Obviously TBD), then see if she will start!!!
11. Run it for 20 minutes @ 2,500 RPM (hopefully it won’t overheat or blow oil all over the place for that 20 minutes!) to break in the cam
Tuesday lunch/night, #’s 1, 2, 3, 5, 6 and 8 (the first half of it anyway) got done. For #4, I needed some cable stops (lost somewhere, I have no clue). And a tool to spin the oil pump (#7) looks like something I would have to order online, or build myself. Blitz recommended just filling the oil filter with oil, removing the plugs and turning it over until it builds oil pressure, and that is what I will do. And a trip Wednesday to AutoZone got me the cable stops I needed for the choke cable hookup.
So, can I get to the elusive # 11 Wednesday night? I am starting to feel like Charlie Brown, and Lucy keeps pulling that damn football away as I swing my foot and grunt, only to fall yet again….. Maybe that is a little too dramatic. It’s not so bad. I am lucky enough to be the kind of person that does understand at least parts of the time, that the journey can be as rewarding — or in cases more so, than the destination. I enjoy working on my car, and it is cheaper than a therapist, but many will argue whether it works the same — at least for a case such as mine :-). We will just have to see — because at this writing, the next paragraph is unknown to me — the same as you…..
Wednesday after work I got the cable stops installed for the choke, that works OK (though they were installed incorrectly, Blitz set me on the right path to correct them). Then I went on to some of the “TBD” stuff. I realized the starter wiring was still not complete, nor was the wiring to the other criticals, like the ignition coil, distributor and temperature sensor. Most of the wiring is either A) Original and really showing its age, or B) Replaced with the ubiquitous red wiring by who knows who. So it was a little tricky. I had not marked things as well as I thought, or some of those labels were lost. I looked in the Bentley manual to try and determine which of the two same colored wires went to the temperature gauge versus the ignition coil. I have about 65{d7bb5f80100d9cc8ed36d8b44483fdbf859ff4aee0deeb25afed5de8e54bd8dc} confidence I have that worked out and yes…… we will see. My pal Tony showed up during my TBD work, and he really wanted to try the oil pump spin, so he crafted a crude tool for that. We wrapped up about the same time, so together we worked at trying to spin up the oil pump to build oil pressure before initial fire up. Tony worked the tool and drill and I turned in the ignition and checked the oil gauge, we showed some pressure! . It really could happen tonight! Or not….
 Massive oil hemorrhage from the spin on adapter. I lost probably a full quart of Brad Penn Break in Oil. So I removed the spin on adaptor and took pictures of it — then called it a night. I went home and e-mailed The Roadster Factory about the correct rubber seals, since I was 80{d7bb5f80100d9cc8ed36d8b44483fdbf859ff4aee0deeb25afed5de8e54bd8dc} sure that the previous owner had installed it and I know he got the majority of his parts from TRF. Its’ a FLOTEC Brand, made in U.K. Unless I pay dearly for overnight shipping, It is likely that this will not be happening in March :-(. By the way, don’t you know UPS loves people like us that order the 10 to 12 individual little parts at the end of their projects? I should buy stock.
March 27th – I slept on it, and woke thinking that I should just relax and do the right thing — punt (meaning – order the correct part and wait for it). But I am an Alabama fan, and everybody know’s, or least Auburn does, that we don’t like to punt. So I compromised, after a happenstance discovery. I ordered the rubber ring/seal I needed (nothing to do with the FLOTEC adaptor by the way, it’s the standard rubber oil filter seal for the TR6, even with the stock canister filter contraption). The discovery was due to that fact that I needed to go by the shop early on the 27th anyway. I noticed that I had put a bead of the RTV I was using the night before on the workbench, I had intended to test its “skinning” to make sure I did not go to long before tightening things up, but I had not done that. So I was going to scrape it off and just tidy up a bit — it was not set. Still as gooey as ever. My RTV was bad! So I got more/new RTV. I had used it on Tuesday night when installing the filter adaptor. On the evening of the 27th, I cleaned up the adaptor mess (gooey RTV on everything, and wiped it all down with grease and wax remover, ready to take some new RTV. And I loaded it up reasonably, and figured it might hold at least until the correct seal makes it here from The Roadster factory. I had a little time on my hands so I also used an old door bolt drill blade (spade blade) and fashioned a better solution for spinning the oil pump (PICTURE?) I let everything set up over the next 24 hours and once again, we will just have to see…..
March 28th – Nothing doing, my daughter came home from college for the first time since Christmas, so I spent time with her…
March 29th, Went to Tinker day at Hamer’s around 8AM, and hung out with the usual suspects, and even a few not so usual. Myself, Hamer, Blitz, David, Russell, Rick Keene, Bill Summerlin, Doc Peden, Bob Smith, Malcolm Branch and even George Needham. I bought a drill press from Hamer and Bob Smith and David Price helped me unload it at my shop. That afternoon, i tested my oil pump spinning tool and it looks like the good RTV worked, no oil leaks this time! So the rest of the afternoon, I installed the oil pump drive gear and the distributor, ready to try and fire on Sunday the 30th!
March 30th – Success! Many thanks to David Price and Blitz Welch for meeting me Sunday morning to get her fired up. And soon after we got there, my pal Tony Loria showed up. Something was funky with the battery, I had charged it, but it was dead. So Blitz got his car positioned to jump my battery, and I think within 5 to 10 minutes of trying start it, she fired up and was running! We got it up to about 2,200 RPM to break in the cam and ran it for 20 minutes per the standard cam break in instructions. Then we idled it down and set the timing to roughly 14 degrees BTDC at an idle of about 1,000 RPM, with no vacuum hose on the advance – then shut her down. A few issues still – the temp gauge was not registering, so we closely monitored the radiator overflow for overheating, did not seem to be a problem. And the starter wiring is fouled up and needs to be looked at. Blitz spent more time in that 5 to 10 minutes at the onset figuring out the starter wiring, than actually spent trying to start the car. In other words – and my opinion – the initial startup was “golden” – and quite easy compared to stories I have heard. Yay for me. But overall, it was a banner day, and real milestone. It’s my first full engine rebuild, and it actually worked! And got it started before March was over! Initial startup video here – http://youtu.be/Tz4jaSNATes.
So today, March 31st — I will close out this write up. Rebuilding and restarting the engine seems to have become the overriding goal, and with that done – this makes a good jumping off point. Thanks for reading — below is the punch list for Andy’s 2013-2014 winter projects (famous last words spoken here – the list isn’t terribly daunting – shouldn’t be too bad):
- Change the oil/filter (getting the break in oil out of there)
- Re-adjust the valves
- Fix Temp gauge issue (was working before the rebuild, so I assume it’s electrical)
- Starter and/or wiring issues (I dread this the most, auto electrics ain’t my strong suit)
- Hook up and bleed slave cylinder for clutch/tranny
- Install interior
- Drive and have fun!
Update – In the 2 weeks since the initial start up, the starter wiring was sorted out (again thank you Blitz Welch), head bolts re-torqued, interior re-installed, clutch slave cylinder installed and “kind of” bled. And on this date (April 13, 2014) David Price and Blitz helped me do a final tune on the motor including inspection of spark plugs, re-adjusting valves, idle adjustments, etc. With this final tune — I was VERY happy with the results. Later that day, my son Dylan and I went for a ride out Old Pike Road. At that moment, I realized how much I had missed those rides with Dylan during the 3 month rebuild process. The weather was great, the car performing like a champ, and my Son in the seat next to me – a golden moment. And one last “THANK YOU” to Blitz Welch, David Price and Tony Loria for helping me get back to the important stuff….
UPDATE, RE-RE-BUILD, 09/25/2014….
OK, as many of you know, the rebuild went sour on April 25th, 2014. So, it had to be re-built again, and here are highlights:
- Block was cracked from an oil starved Cam journal overheating, got a new block from Lee and Mary Oxford
- Had the new block bored to 020 over to match the pistons from rebuild #1 (they were OK)
- Put it all back together (help from David Price and Blitz Welch!)
- Cranked it up and broke in Cam on 08/27/2014 (more help from David Price and Blitz Welch!)
- And exactly 5 months after the 1st re-build tanked, I am happy to write that I have the car tuned up pretty well (help from Blitz Welch!), and have more than the 612 miles within which the 1st re-build went bad
- We will see…..
[More PHOTOS]